ZoneMinder Client 0.2.0.1-signed.1-signed Requires Restart
by kevin186
ZoneMinder Client is a Firefox Extension that provides toolbar buttons and other features to help you when connecting to your ZoneMinder Server.
About this Add-on
* Created By : Kevin Godell
* Features : Toolbar Buttons, ZM Mode, Debugging
* Tested with : ZoneMinder v1.24.2
* To Do List : Create Toolbar Button Icons, Make Toolbar Customizable, Add a “Watch” Toolbar Button, Test with ZoneMinder v1.25.0
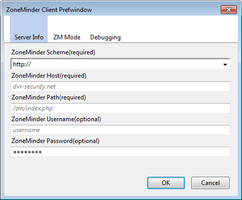
After installing ZoneMinder Client, you will be prompted to enter your ZoneMinder Server information in the ZoneMinder Client Prefwindow. If you are not prompted, please go to Tools → ZoneMinder Client → Server Info. The information that you need to enter includes the url address and your login credentials of your ZoneMinder Server. The url address is broken down into: scheme, host, and path. Using the example url address of http://dvr-security.net/zm/index.php, we can break it down to 3 parts. The scheme is http://. The host is dvr-security.net. The path is /zm/index.php.
Please note: Your ZoneMinder Server information must be accurate and precise for ZoneMinder Client to function properly. For example, dvr-security.net is not the same host as www.dvr-security.net. Also, if you leave the Username and Password empty, you will be prompted to enter them when you press the Log in button.
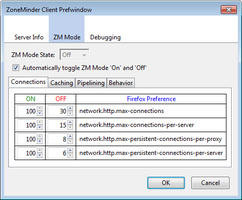
While in the ZoneMinder Client Prefwindow, you will see a tab labeled “ZM Mode.” ZM Mode is a special feature that automatically changes some important Firefox settings for you. For your Firefox browser to interact properly with your ZoneMinder Server, the ZoneMinder Wiki recommends that you visit about:config in your Firefox browser and manually edit some settings. Some of the recommended settings are for Firefox’s cache and network connections. It recommends to disable the cache and increase max network connections. This may work well for when you are viewing your cameras on your ZoneMinder Server, but may impede your regular web surfing. If you set ZM Mode to “auto,” ZoneMinder Client will determine when to automatically change Firefox’s settings for you. For example, when you are visiting your ZoneMinder Server in your Firefox browser, ZoneMinder Client will automatically disable Firefox’s cache. After you close the last tab containing the url to your ZoneMinder Server, ZoneMinder Client will automatically enable Firefox’s cache. All of the Firefox settings that ZoneMinder Client can manage include: network.http.max-connections, network.http.max-connections-per-server, network.http.max-persistent-connections-per-proxy, network.http.max-persistent-connections-per-server, browser.cache.check_doc_frequency, browser.cache.disk.enable, browser.cache.memory.enable, network.http.pipelining, network.http.pipelining.ssl, network.http.proxy.pipelining, network.http.pipelining.maxrequests, browser.link.open_newwindow.restriction, and dom.allow_scripts_to_close_windows. For a detailed explanation of each of these Firefox settings, go to the ZoneMinder Firefox Settings page.
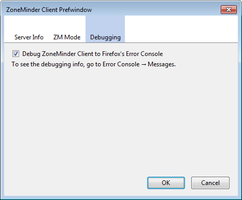
The other tab in the ZoneMinder Client Prefwindow is labeled “Debugging.” The Debugging feature allows you to output messages to Firefox’s Error Console. Almost all actions taken by ZoneMinder Client can be logged to the Error Console. To view Firefox’s Error Console, go to Tools → Error Console → Messages.
After updating the settings and closing the ZoneMinder Client Prefwindow, focus your attention to the new Toolbar near the top of your browser. It currently contains 5 buttons: Console, Montage, Cycle, Options, ZM Mode, and Feedback.
Clicking on the Console button will load the Console page of your ZoneMinder Server. The Console button has 2 sub-menus: Authenticate and Bandwidth. The Authenticate menu is used for logging in and out. When clicking Log In, a log in request will be sent to your ZoneMinder Server. If the log in is successful, any tabs that are open to your ZoneMinder Server will be reloaded and the Console page will be loaded/reloaded. If you click Log Out, your “Logged In” cookie will be deleted and all tabs that are open to your ZoneMinder Server will be reloded to show the “ZoneMinder Login” screen. The Bandwidth menu is used for changing the frame rate at which you view the camera feeds. The three options are: High, Medium, and Low. When making a Bandwidth selection, ZoneMinder Client will automatically reload any open tabs that contain camera feeds so that the new Bandwidth settings will take effect immediately.
Clicking the Montage button will load the Montage page of your ZoneMinder Server. The Montage page is where you will see all of your camera feeds together. The Montage button has 2 sub-menus: Layout and Scale. The Layout menu has 5 choices: Default, 2-wide grid, 3-wide grid, 4-wide grid, and 3-wide grid scaled & enlarged on alarm. Your ZoneMinder Server saves the Layout setting as a Cookie in your browser. The Scale menu has 9 choices: 4x, 3x, 2x, 1.5x, Actual, 3/4x, 1/2x, 1/3x, and 1/4x. Since your ZoneMinder Server does not save your Scale Selection as a cookie in your browser like it does with the Layout selection, ZoneMinder Client will remember your Scale selection and apply it every time your load the Montage page.
Clicking the Cycle button will load the Cycle page of your ZoneMinder Server. The Cycle page will rotate through your camera feeds at a set interval. There are no sub-menus under the Cycle button.
Clicking the Options button will load the Options page of your ZoneMinder Server. The Options page is where you can change all of the server settings of your ZoneMinder software. In a later version of ZoneMinder Client, there will be sub-menu links under the Options button.
Clicking the ZM Mode button will open the ZM Mode menu. In the menu, you can manually set ZM Mode to “On” or “Off.” You can also choose “Auto,” which will automatically set ZM Mode to “On” or “Off” for you.
Clicking the Feedback button will open a new tab to http://dvr-security.net/zoneminder-client/version-0-1-0/#respond. You can leave feedback including: bugs, suggestions, and questions.
![[Warning]](https://addons.thunderbird.net/static/img/developers/test-warning.png?b=58a99cbb-667a0970) Permissions
Permissions


